Wireless Remote control evaluation

I have been aware for some time of the deficiencies of remote cable releases for cameras. I have used a cable release with a homemade extension for decades. Back in the 70s and 80s a cable release was often a Squeeze bulb forcing air through a plastic or copper tube to an air cylinder mounted on the shutter release. Later as cameras became electric rather than mechanical the cable release became an electrical cable with a pushbutton. While wired cable releases work reliably they present a tripping hazard, were seldom available in long lengths unless home made and I always  found seventy feet of cable awkward to carry, hard to unravel, and use in the field, as well as  adding considerable weight to your kit. I often use a remote release in a hay field photographing Meadow Larks and other unapproachable grassland birds. There is a constant danger of the cable pulling the tripod and camera over and it is awkward to set up. In the past remote radio controls were expensive, fairly large and often unreliable. Recently I had noticed small Chinese (no brand name) made remotes that seemed to be based on automotive chipsets used for keyless entry. I purchased a unit listed on Ebay for the grand sum of $21.99 USD with free shipping to Canada. I was suspicious that such a low cost unit would not work well in the field if at all. When 
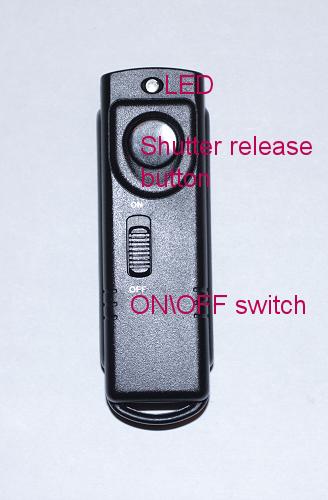
it arrived I did a quick test to see if it would function. This was a  challenge as there were no instructions as such with the unit other than 
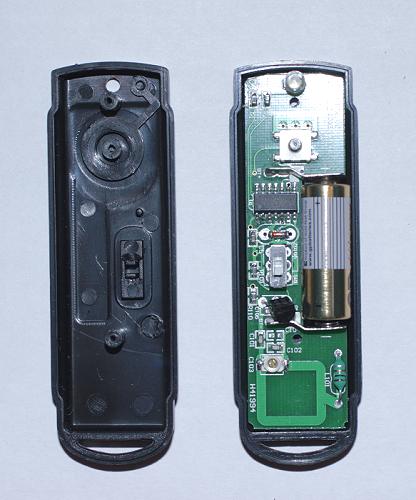
a few notes on the box. After I puzzled out how to make it work I then decided to open it up and see what components it used. It appeared to be reasonably well made though not sealed for moisture. I measured the current draw of both the receiver and transmitter to see how long I could expect it to last in the field (estimates below) and also to see how many spare batteries I should purchase.
 

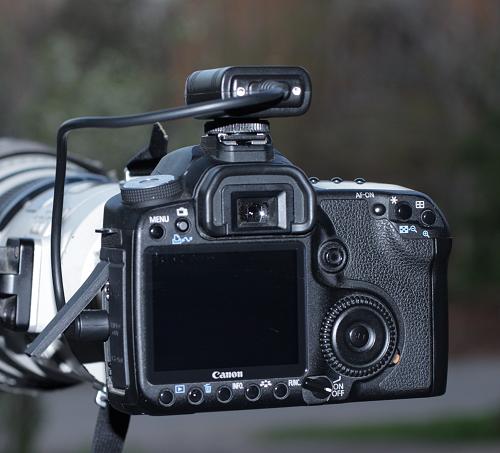
I tested indoors and it would work through walls in my home. I then  tested it outdoors and found it seemed to be reliable up to about 80 feet  or so  provided there was a clear  line of site from receiver to transmitter. It is important to try to align the receiver so it faces you so that you can see the LEDs and know whether the camera is firing. Provided the receiver was aimed at me I could make out the LEDs in  sunlight - provided the sun was 
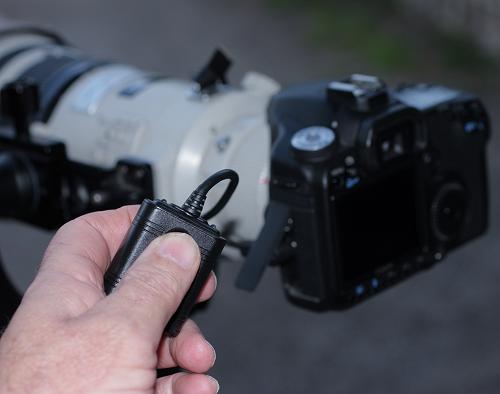
not directly on the LEDs. It is not always possible to hear the camera shutter trip at an 80 foot distance particularly on a windy day so the LED confirmation is a good idea. It may be nessessary to shade the LEDs with a hood to make them more visible depending on lighting.
 

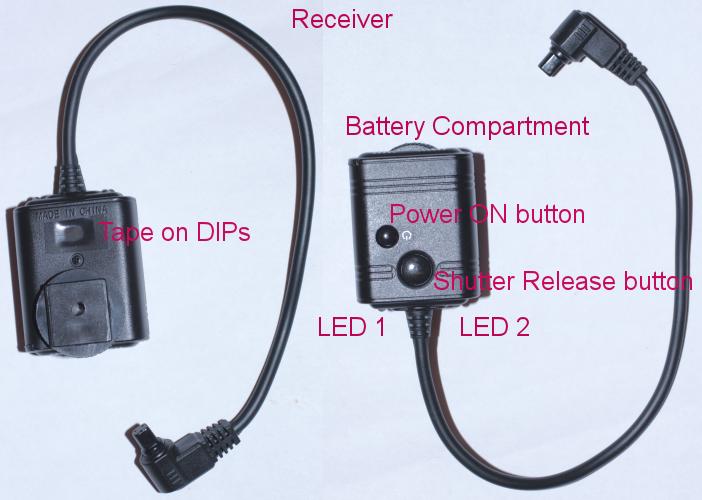
One vulnerable part of both the receiver and transmitter is the DIP switches. These switches are used to set each unit to one of sixteen possible channels. This is useful if you are shooting in a group as it allows each photograher to trip their own camera and not their neighbors!  The problem though is DIP switches are rather sensitive to dirt and moisture. An easy solution is to cover the DIP switch with a small bit of vinyl electrical tape to seal it. The tape can be easily removed if necessary. 
 

An additional test was to place the reciever and transmitter in the freezer for 2 hours then try them again. Cold can have adverse effects on electronics and I wanted to be sure it was capable of operating in mild winter temperatures at least - no problem the unit worked fine .

 
To use the device as a wireless remote control:
1- Mount the receiver onto the camera hot shoe and tighten the mount wheel to  hold it in place. (If using a hotshoe or built-in flash skip this step and just let the receiver dangle by the cord)
2 - Insert the cable plug into the camera remote release socket.
3 - Push and hold  the small button until the front LED 1 lights. (LED1 will pulse once per second when the unit is powered ON)
 

Used as a wired one foot remote control:
1 - Insert the cable plug into the camera remote release socket.
2 - The receiver can also be handheld and the large button used to trip the camera. This does not require it to be turned ON or even have a battery inserted for this to work.


Transmitter (remote control):
1 - Set the ON/OFF slider switch to ON.
2 - Press the shutter release button part way to activate the cameras metering system.  (The LED  on the remote transmitter will light as will the receiver LED 2)
3 - Press the shutter release button completely to trip the shutter. (The LED on the remote transmitter will light as will the receiver LED 2, LED1 will go out)
note: It may be better to watch the card write indicator lamp on the camera as confirmation that the camera fired as it is larger than the reciever LED.

Usage tip:
I found if the camera  Drive (Canon 40D) setting was at continuos high speed that each actuation of the transmitter would trip the shutter twice. Not a major problem as I need two or three frames on a Meadowlark or Swallow fly by  usually but if you only want one frame then  set the drive to single frame. 
 

Bulb Mode:
There are only twotransmitter  controls, an ON OFF switch and the shutter release button. This button functions identically to the shutter release button on the camera with one exception. Pushing the shutter release  button part way activates the cameras metering system, fully depressing the button trips the shutter. Unlike the shutter release button on the camera though - if the button is held for 2 seconds or longer then the camera will open the shutter and not close it until the button is pressed again. This is refered to as bulb mode.
note: the camera does not have to be set to bulb mode for this to work
 

Battery Life:
The transmitter uses a 12V battery and requires screws to be removed to replace it. Based on my current measurements this should not have to be replaced for years as it draws very little current.

The receiver uses a  3V Lithium  battery that should provide around 150 hours of use according to my current measurements. For most of us this should last a very long time provided we remember to shut off the power when we are not using it. Fortunately  LED 1 pulses once per second warning us that the  power is ON. 

Both these batteries have shelf lives of several years  but it is a good idea to keep a spare set handy.
Receiver requires  battery - model  CR2 3V lithium, 700-800 mAHr,  non rechargeable
Transmitter requires battery - model C23 AE 12VDC alkaline, 33-41 mAHr  typical depending on manufacturer. This is the 12 Volt Alkaline Battery used in many automobile keyless entry systems and other applications. 

Speed of Response:
One concern I had was the delay from the time the transmitter button is pressed to when the shutter is released. I was suprised to find no noticabe difference between using the transmitter and using the camera shutter button, thou it is likley there is some additional delay.  Activating the metering first with a partial push of the button and then completly deprssing the shutter release may speed up the response slightly.


The receiver mounted on the camera 


Using the receiver as a short cable release


Remote Transmitter


Remote Transmitter (opened)


Conclusion:
The implementation and functions appear to be satisfactory, time will tell if the unit performs to satisfaction in the field.  Let me know if you experience problems with these units.


Technical specs as measured:

Receiver current draw:

  • Switched OFF 0 ma
  • Switched ON   5 ma 
  • Metering active  8.5ma   (remote button partially depressed)
  • Tripping camera  9.2 ma   (as long as remote button is fully depressed).
Transmitter current draw:
  • Switched ON  .6 uA 
  • Pushbutton fully depressed 8.2 mA 

Return to Index